Tuesday, April 23, 2024

Tee Pee Card


My version of the tee pee card.  Instructions use a 3 1/4 inch square of card stock so you use a 3 inch square of DSP which is convenient for the 6 x 6 pieces.  You can use 4 inch, 3 3/4 inch or 3 1/2 inch instead just adjust the size of the DSP accordingly. 


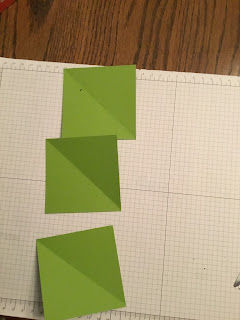
Three 3 1/4 inch squares of card stock   Score diagonally from one corner to the other 


Two pieces of DSP 3 inch squares  


Cut diagonally from tip to tip forming 2 triangles from each square. You will only need 3 of the triangles. 

 Glue the DSP to one half of each of the card stock squares aligning along the score line. 

Glue one of the DSP triangle sides over a plain card stock side. Be sure you only add glue where the cardstock overlaps.  Line up the edge by folding the top one over the bottom one to make sure it folds easily  

Adhere the third piece of cardstock DSP section onto the blank cardstock on the piece already glued together 


I use Velcro thin clear fasteners that are 5/8 inch and have 75 in a package   ID number is 91302 and available on Amazon  

Place both pieces of the Velcro dot together and place one glue side down into the non-scored corner behind a DSP section   


Fold it so the DSP section covers the opposite blank triangle section  press firmly to attach the Velcro dot  


If done correctly the DSP side will have the Velcro dot adhered like this (sorry the photo is fuzzy)  


Decorate with sentiment and embellishments as desired. When placing items on the tee pee be aware that you aren’t exceeding the envelope size.  
To place in envelope, undo the Velcro and fold in half to lay flat.  


I try to remember to include this little note with instructions in case the recipient doesn’t realize how to assemble the card for display. 

ALTERNATE DESIGN OPTIONS:

If you don’t have the Velcro dots you can uses ribbon, a slit or magnets. 

RIBBON CLOSURE: 
   
Before adhering the DSP attach about 8 inches of ribbon to the lower tip on the right side when laid like this.  Fold into a tee pee and add a second ribbon on the edge that meets up with this ribbon. 


The ribbons will tie like this.  Continue as above to complete the card. 


SLIT CLOSURE: 
    

After adding the DSP, fold into a tee pee and using an exact o knife or blade of some sort poke a tiny holes on either side of the DSP tip where you need the closure. 

With the blade cut a slit between the punctures. 

Tuck the tip into the slit. 

You can also use small magnets however I find them too bulky.  And if the recipient would not want to disassemble the card you could use a piece of adhesive that has a protective cover on one side.  Place the tape behind the tip but don’t remove the protective cover.  Instruct the recipient to remove it and stick the tee pee together. 

ADDING WHITE SECTIONS :
You can add white sections for a message by cutting a 3 inch square of white cardstock and cutting it in the angle to have triangles that fit the sections of the card. 


 This can be added in place of one piece of DSP or on the back side of the card stock. 


Wednesday, March 6, 2024

Quilted cards

 A great use for scraps of patterned paper.  


I use the hexagon punch but you can also use squares or triangles. 

I punch a bunch of hexagons from several pieces of the paper.  You can coordinate several different designs or just use random scraps. 


I cut a base of card stock. If you are wanting a particular size, cut the base a little larger as you will trim the edges later. 
In addition to the whole hexagons, punch out partial ones as these can be used to fill in the edges of your design. 

For the alternating  pattern, place the first hexagon near one edge. 
Add the next hexagons along the straight edges. I usually place the whole hexagons first then go back and fill in the partials. Leave a small space between the pieces. 

Continue to add hexagons in the pattern. For this alternating pattern I am alternating the rows and columns using 2 designs. 


Fill in the edges using abt partial pieces that fit the patrrrn.  Use full pieces as needed. On this one I could have done another partial column on the right but I decided to trim
that off. 

Flip the card stock and trim the pieces that are extending over the edges of the base.  Then use a paper trimmer and trim off any edges that have too much base showing.. 
(You could skip the first trim step and just use the paper trimmer but I like to save any partial pieces that get trimmed off in the first step to use on another card. ) 


Once trimmed, use an embossing folder to make the stitching design. I use a quilt top pattern sold by Stampin Up - now retired. 

Mat on a coordinating card stock base cut 1/4 inch larger thank the base card stock in both directions. 

Add to your card front and decorate as desired. 

Pattern of rows. Make a row of one design. 


Make additional rows of different paper designs. . 

Random design. Add hexagons in no pattern at all.  


Flower design.  I usually place the center hexagon first near the center of the base.  Then fill in around it with a second paper design.  Then fill in the edges in a third paper design. 


If you want to prepare your pattern before gluing you can lay the hexagons out on your workspace first.  


Monday, February 12, 2024

Easel Sticky note holder


Easel Sticky note holder.  

Care stock - 3 1/2 x 4 
                     3 1/2 x 8 1/2 
Sticky notes - 3 x 3 inch pad 

Score the 8 1/2 inch piece of card stock at 2 inches, 4 inches, and 4 1/2 inches.  Fold all in the same direction which will cause the card stock to curl up somewhat.  

Add a strong adhesive to the 2 inch section on the outside of the curl. 


Place the 4 inch piece on the adhesive lining up the corners and edges. 
NOTE: if you are stamping anything directly on the 4 inch piece which will be the focal point, do it before adhering it. 

Attach the sticky note pad to the 4 1/2 inch section on the inside of the curl.  Space it evenly along the front and side edges.  There will be about 1// inch gap between the pad and the first score line.  

Tuck the edge of the cover behind the sticky notes.  
Decorate the front as desired. 


I made these as teacher gifts. Added a  intraday piece of card stock 3 1/4 x 3 3/4 to the top and then just added the die cuts for the apple and the stamped sentiment.  


This is a simple one I made just adding some DSP and a sentiment.