Thursday, December 30, 2010

Purse Post-It


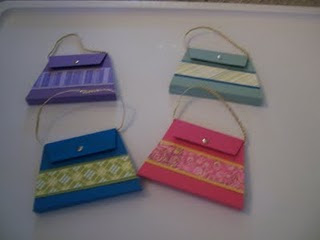
Many have asked for the Purse Post-it instructions so here they are - if you want to make a template just follow the instructions up to the point where I start adding the ribbon handle. Keep that piece of card stock as your template. The dimensions will work with a standard 3 x 3 inch pad of Post-its. I usually split the pad in half and put only one half in each purse- they fit better that way.

Cut a piece of card stock 4 7/16 by 8 inches. Measuring from one of the short edges (this will be the flap of the purse - we will call it edge A), score at 1 1/8 and 1 3/8 inches. Turn it and measure from the other short edge (the bottom of the purse, we will call this edge B) and score at 3 and 3 1/2 inches. ( I used Dusty Durango from Stampin Up for this one.)

On edge A make a mark 3/4 inch from each corner.
On edge B make a mark 1/2 inch from each corner.


I draw a dashed line to help in the cutting. Connect the marks on edge A to the 3 1/2 inch score line. Connect the marks on edge B to the 3 inch score line.

This is one of the corners with the 1/2 inch mark and diagonal line drawn to the score line.
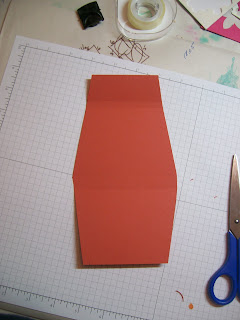
Cut along the lines to create the angled sides of the purse.
There- you have your template.

To complete the purse. Fold along the score lines. Attach a piece of ribbon or cording (the 1/4 inch grosgrain ribbon from Stampin Up works perfectly - I used Very Vanilla) between the score lines closest to edge A. Be careful to not twist the 'handle' when attaching. I used Sticky Strip to attach mine.

To decorate the front and back I cut two 1 1/2 inch strips of a card stock and two 1 1/4 inch strips of DSP. In my sample I used Pumpkin Pie card stock and Razzleberry Lemonade DSP. The length is not critical - it just needs to be longer than the width of the purse where you are going to adhere it.

Adhere the DSP to the card stock. I put them about 1/2 from the score lines (purse bottom) so the flap does not cover the stripe on the front.

Trim down the stripe to match the purse edges. I usually flip it over and cut along the purse edge.
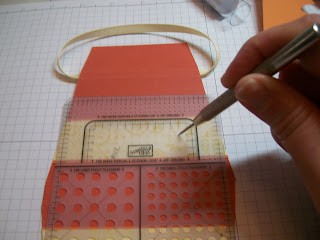
Since I had my Trio Flower punch out I decided to decorate it with those.
I waited to add the flowers until after adhering the stripe to the side of the purse because I wanted them evenly spaced. I should have measured the stripe, trimmed it down, added the flowers and then adhered to the purse. If I had done it that way the backs of my brads would not be showing inside. - Oh well - lesson learned.
I used my mat pack and piercing tool to evenly space the flowers. The brads are some I had pre-Stampin Up demonstrator days.

I added a piece of Velcro fastener to the flap and purse front. I have found the easiest way to do this is put the two pieces of Velcro together. Remove the paper from one piece and adhere to the purse flap where you want it. Remove the paper from the other piece (do not separate the two pieces) and push the flap down onto the purse front being careful to 'center' the flap. That way the Velcro is exactly where you want it. Now you can separate the Velcro.


The fake snap on the front is something I had from pre-Stampin Up days also. When I run out of those I will probably use a brad (vintage, silver or gold) and put it on before adding the Velcro.
Hope this wasn't too confusing. I had not made any for a while and had to re-learn the process.

It's really fun coming up with designs and color combinations. If you try this, let me know how they turned out and post a link to photos if you have them.

Tri-Fold Shutter Card

I found this card design on Split Coast Stampers, however I have edited the dimensions so it will fit in the standard invitation envelope.

For this one I used the Razzleberry Lemonade DSP, Three Little Words stamp set, Pumpkin Pie, Rich Razzleberry, Melon Mambo and Crushed Curry card stock, Melon Mambo, Rich Razzleberry and Bermuda Bay ink pads.


You will need the following cut pieces:

Color A (Pumpkin Pie) 10 1/2 x 5 1/2 inch (1 piece)

Color B (Crushed Curry) 3 1/4 x 2 1/4 inch (3 pieces)

1 1/2 x 1 1/4 inch (4 pieces)

Color C (Melon Mambo) 5 1/2 x 1 1/2 inch (2 pieces)

Color D (Rich Razzleberry) 3 1/4 x 1 1/4 inch (2 pieces)

Whisper White - 2 x 3 inch (3 pieces)

DSP #1 (goes on Color B) 1 1/4 x 1 inch (4 pieces)

DSP #2 (goes on Color C) 5 x 1 1/4 inch (2 pieces)

DSP #3 (goes on Color D) 3 x 1 inch (2 pieces)


Place one long edge of Color A at 1 1/2 inches and cut a slit from the 1 3/4 inch mark to the 8 3/4 inch mark.

Turn the piece around and repeat along the other long edge.


This will make two long slits in the piece of Color A.


Place the paper so the slits are perpendicular to the cutting line with the short edge of the paper at the 8 3/4 inch mark. Score from the outside edge just up to the cut mark. Do not score all the way along the paper. Score from the opposite edge of the paper down to the cut.
Flip the paper and repeat on the other end.


Slide the paper to the 3 1/2 inch mark and score from one edge to the other and again at the 7 inch mark.


I have found the easiest way to fold it to turn it so one short edge is away from you and fold the first score marks up and the second ones down. The paper will look like this.

Flip the paper and repeat on the other end.


Your piece will look like this. Each score line is folded the opposite way of the one next to it. Now you get to decorate.


I used Rich Razzleberry for the words, Melon Mambo for the flower portion, Bermuda Bay for the flower stem and Crushed Curry sponged around each piece.


I did the flower by stamping off to get a bold image among several muted ones. I took a sponge and added Crushed Curry around the edges of all three pieces.


I go ahead and match up all my pieces, then adhere them all before adding them to the card.


Ready to put it together.


Place the DSP ones on first as shown above.


Add the stamped images last. I used Dimensionals to the inside corners of the front and back pieces.


Isn't this a fun card that anyone would be happy to receive?


Tuesday, November 30, 2010

Gift Card Holders

A quick little idea for those holiday gift cards.

Start with a piece of card stock 8 1/2 x 4 1/2 inches. Score and fold into a tri-fold. I did two variations but unfortunately did not get photos of each step. Hope you can figure it all out - if not, just shoot me an email and I will clarify.
Email Mary


Ornament card holder Use Real Red card stock and score at 2 1/2 inches and 5 1/2 inches. Fold so the shorter section is inside the other two sections. Decorate the outside using the Platinum shimmer paint and the 'snowflake' stamp from the Delighful Decorations stamp set.

Cut a piece of silver card stock 2 1/2 x 4 inches and trim the corners with the Ticket Corner punch.


Take a piece of ribbon about 20 inches long and adhere to the center of the silver -leaving a much longer tail on one end than the other (You can wrap the ribbon around the scored card stock folded to get an idea of how long you will need and where to position it - leave plenty of ribbon to be able to tie a bow). The ribbon is adhered to the BACK of the silver card stock.
Turn the silver card stock over and adhere to the front of the gift card holder.


Decorate the front - Cut a piece of Whisper White card stock 2 1/4 x 3 3/4 and trim the corners with the Ticket Punch. Stamp an ornament from the Delightful Decorations using Garden Green in the left upper portion. Stamp an ornament using Real Red on a scrap of Whisper White and punch with the Ornament Punch. Adhere in the lower right portion using dimensionals.


For the inside cut a piece of Garden Green 2 3/4 x 4 1/4. Make slits using the Slit Punch (retired) or an exacto knife. (I had to play with this a little to get the slits right where I wanted them - not sure how you can measure that but mine were a little more than 1/4 inch from the edge.)

Adhere the Garden Green to the inside center of the card being careful to not get adhesive on the slit areas.
Insert gift card, fold and tie a bow!

Merry Christmas Gift Card Holder
For this one I used More Mustard and scored it at 2 1/2 inches from either end.
I used a piece of Garden Green 2 inches x 4 inches on the front.


I stamped the Merry Christmas from the Christmas Greetings set using Real Red on a piece of Whisper White cut 2 1/4 x 3 3/4 and after trimming it with the Ticket Punch, sponged on Garden Green.


I did not put a piece inside but just punched my slits into the More Mustard.

Saturday, October 9, 2010

Punchy Rudolph


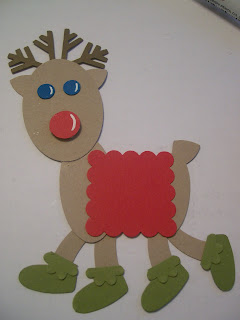
I love the punch art reindeer - and it has been so much fun making a whole set of these for some scrapbook pages. Here is a layout of what you will need to make a reindeer. You can alter the colors to make each one unique.

You can gather all these before you start or just have the punches and paper handy to punch as you go along.
Let's get started!

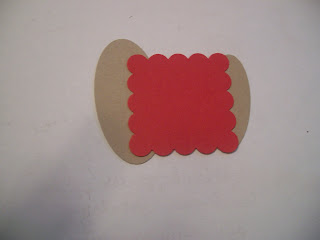
I usually start with the body. You will need the large oval and the small oval . Connect them to the scallop square which is the blanket for the reindeer.

Trim the hearts and cut the boho flowers in half to make the shoes. The shoes can be altered by changing the color of leaving off the flower trim at the top so they look more like boots.

I think the easiest way to punch the legs is to punch your wide oval for the head then line up the punch along the edge and punch a narrow strip.

You will need two of these and then cut them in half to make the 4 legs.

Attach the shoes to the wider end of the double-punched oval pieces. Be sure the oval curves in the correct direction.
Attach the legs to the body. Play around with the placement to get them just where you want them.
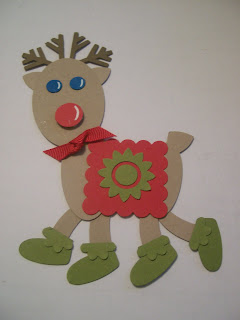
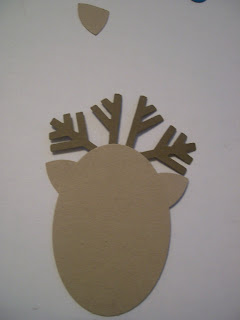
Next comes the head - attach the antlers to the back of the head near the top. You have to leave room for the ears.
Attach the ears below the antlers. Check the position from the front.
Add the nose and eyes - the white gel pen really makes them pop. I used a dimensional to adhere the nose. If you are doing a whole group of reindeer you would only need one with a red nose (dear old Rudolph) and the others would have basic black, basic gray or maybe early espresso for the nose.
Attach the head at the neck. You can tilt it at different angles to see exactly which look you like best. Different angles give the reindeer a little attitude :-) And don't forget the tail ! I usually place the petal point downward and attach to the rear.

I tied a knot in the 1/4 inch real red grosgrain and glued it at the neck. Then decorate the blanket however you want. For this one I used the largest boho blossom and punched the center of the blossom using the 1/2 inch circle punch. I punched a small circle using the itty bitty punch set and placed it in the center.

If you try some - please post a link to your photos so I can check them out. Would love to see your ideas on how to decorate or improve my reindeer.

Trifold Card

This is a picture tutorial for a tri-fold card that has become really popular. I am showing it with the Garden Greenhouse stamp set (one of my favorites!) but it can be done with many other themes.

Card Stock: Pacific Point, Whisper White
Inks: Melon Mambo, Bravo Burgundy, Perfect Plum, Elegant Eggplant, Marina Mist, Pacific Point
Ribbon: 3/8 inch taffeta Marina Mist
Stamp Set: Garden Greenhouse, Herb Expressions

To being you need to choose the color combinations for the two step stamp set. These are the colors I am using today but I have done other combinations and all have been lovely.

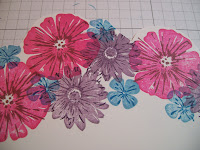
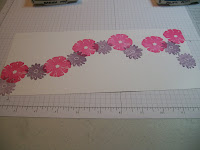
Cut a piece of Whisper White card stock to 5 x 11 inches. Using the largest flower background stamp and Melon Mambo ink, randomly stamp flowers in one of the base colors from the lower side of one 5 inch edge to the upper area of the other 5 inch edge. These should basically follow a diagonal line but not actually 'touch' each other.

Fill in some with the second largest flower base stamp and Perfect Plum ink.


Fill in with the smallest flower background and Marina Mist ink. You should have a continuous row of flowers - if not, fill in as needed with all three flowers.

Trim away the white card stock about the row of flowers. You can get as detailed as you want when cutting. I usually don't do a lot of detail since that makes the next steps a little harder. (I have laid the white paper on a piece of Pacific Point so it is easier to see the edges.

Turn the paper over to the blank white side.

Repeat stamping flowers on the blank side. These do not have to be exactly like the flowers on the other side. If you are really detailed you may want to use the Stamp-a-ma-jig to get the flowers lined up exactly with the cut edge. I just tried to get close to the edge and did go over the edge a time or two but it is not noticeable. Use all three flower stamps and the colors you used on the front until you have a continuous row across the back.


Use the second stamp for the largest flower to add the detail to those images using Bravo Burgundy. Be sure to do both sides of the paper.


Follow with the other flowers using Elegant Eggplant on the Perfect Plum flowers and Pacific Point on the Marina Mist flowers.
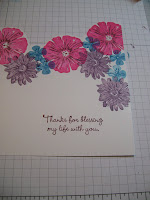
Stamp a sentiment if desired This is stamped on the front side at the right end of the piece of card stock - the taller edge. I used one from Herb Expressions.

Score 4 inches and 8 inches from the taller edge. Fold in opposite directions.

Take a piece of Pacific Point - 5 1/2 x 4 1/4 and adhere an 18 inch length of ribbon near the bottom. I put my ribbon slightly off centered because I wanted to tie my bow off-centered.
Adhere the white card stock over the ribbon.
Fold along the score lines and tie the ribbon on the front. Isn't that a special card for a special friend?

This is another version that I came up with that doesn't use the ribbon. Make the card - omitting the ribbon step. Adhere the front pieces together. This just makes a two-sided front to the card.


I stamped and cut out a couple more flowers and added them to the lower left front to cover the fold. The smaller one is adhered using a dimensional.
Here are some other ideas for this style of card:
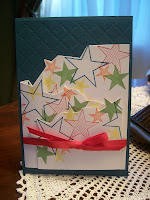
Using the Starring You stamp set and a variety of bright inks. What a great birthday or congratulations card!


This one uses the I Heart Hearts stamp set - sweet valentine?
A cute Christmas card using the Delightful Decorations stamp set. There are lots of possibilities - if you come up with one please post me a link to your photos.