I don't know if this album has a name but everyone I show it to says "Oh My Gosh!" when they see all the different panels and sections to put photos. So I am naming mine OMG Album. I saw one that Sue Kober (another demo) made and she got the idea from someone else so this is not original by any means although mine might be just a little bit different than Sue's.
I've made this in two sizes, 5 x 7 inches and 5 x 5 inches. The one in the tutorial photos is a 5 x 5 inch album. I have included the dimensions for the 5 x 7 in parentheses.
You can make it any size - you just have to cut your card stock the height you want. The other dimension should be twice the width you want. So for the 5 x 5, you cut the card stock 5 inches (the finished height) by 10 (twice the finished width). For the 5 x 7, you cut the card stock 7 inches (finished height) by 10 (twice the finished width). I used 5 inches for my widths because I could then use the 8 1/2 x 11 card stock. If you wanted a 6 x 6 inch square album you would need to use the 12 x 12 inch card stock and cut it 6 (finished height) by 12 (finished width).

This one is a baby album shower gift. The nursery is done in lavendar and pink with butterflies, dragonflies and flowers. And the baby is already named which was nice so I could include it on the cover. Of course, I could leave that area empty and make the name after the baby was born and add it to the album. The mom is not a real crafty person but appreciates crafty items. I will offer to add the photos when she has some, or work with her to do so.
Card stock used is Wisteria Wonder, Pretty in Pink, Pink Pirouette and some Wild Wasabi. The DSP is from the stacks of Subtles. I will identify stamp set, dies and other items as I go along. SO let's get started.

You need to cut 4 pieces 5 x 10 inches ( 7 x 10 inches) and score along the longer side at 2 1/2 and 7 1/2 inches. Fold along the score lines to make flaps.
You will also need two pieces in the finished size, 5 x 5 inches (5 x 7 inches).

Using sticky strip adhere two of the folded pieces back to back.

Add the other two folded pieces by adhering the flaps to the flaps of one of the pieces used in the previous steps - see the photo above. You should have 4 flaps on one side (I call this the front) and 2 flaps on the other side (I call this the back)

Adhere the two square pieces to the flaps on the back as shown. That gives you the basic shape. To close it you need to fold in the two pieces on the back, one on top of the other (if they do not lay nicely you may need to trim along the one edge.
Fold one panel over the other on the front being careful of the flaps. Determine where the ribbon will go to enable you to tie the album shut. I like to put just a short piece of sticky strip on the panels wherethe ribbon will need to go but do not remove the red protective film until you are ready to add the ribbon.
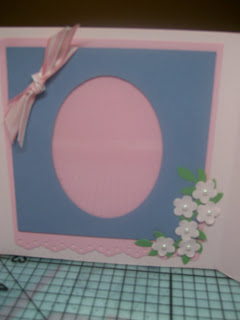
Decorate the panels and flaps as desired. I will go through each panel and flap to give you ideas for decorating. On the front (photo at the top of this post) I used the 2 1/2 scallop punch to make some leaves behind my flower. Then I layered a Fancy Flower punch, two of the 5 Petal punch flowers with the top one turned so you can see both. Then the 1/2 inch circle and a brad.

As you open the album you can get a little taste of what is to come. The flaps are overed with Wisteria Wonder card stock and the Pretty in Pink DSP. On the first panel I have the Punch Post flower with a couple petals from the 5 Petal Punch places as leaves.I layered the 1/2 inch circle and the circle from the trio punch set.

Open those flapsand you see a panel for a photo among the hearts. The two flaps can also receive photos. The stamp set is So Cute which is retired. The squares for the frames are 2 3/4inches and work perfectly with the pinking hearts punch.

On the center panel, I used versamark on the Wisteria Wonder for a subtle embellishment. I think it would be cute to put the Length , weight, date and time in the hearts punches.

Another panel to match the first.

This shows the album all open and free standing. Pretty isn't it? But wait there's more!

Turn the album around and you have the back side to explore. This is the very back panel. I used the Baby Tees roller and cut out the ones I wanted.

Open the back flap and you find this - Butterflies and lace. The lace border was added to cover up the seam in the base paper.
I used the windowsheet inside this frame.

The completed back side is shown here. I hope you have as much fun creating yours. Hayley has two big sisters so I plan to make albums in their favorite colors this weekend.
 The card is actually a sleeve with another piece of card stock that slides out when the ribbon is pulled.
 Decorate the front as desired. The dimensions of the pieces I put on the front are 3 1/2 x 4 inches and 3 1/4 x 3 3/4 inches.
 The 'slider' piece is a base measuring 3 3/4 x 4 7/8 with a stamped piece measuring 3 1/2 x 4 5/8.
 The colors used on this care were Certainly Celery, Pool Party and Calypso Coral. The stamp sets are Pennant Parade and Bring on the Cake. The Petite Pennants Builder punch was used also.


